
Hello!
I'm pretty sure you're casting your mind back through the Fashionicide Archives just as I was, trying to recall the last time I devoted an entire blog post to nails. Put simply, it's been a long time, and I needed to rectify the situation post-haste!
There was a time, maybe a couple of years ago, maybe less, where I'd paint my nails new colours every other night. I'd go through the full routine of removing the previous colours fully, picking out a whole new set of colours, applying to the nails, covering with topcoat and waiting for them to dry. Oh how I wish I had the time to do all of that again.
So, with my time fast becoming filled with all sorts of other activities in the evenings and weekends, I found myself almost forgetting that I had nails - until that is, of course, one of them suddenly felt as though it was about to break, or a big massive chip appeared on the lacquer. My nail routine was so bad that I was applying a new set of polishes once a week, and we all know that nail polish just doesn't last a full week, no matter what the press releases say.
It was a truly sorry state of affairs, my poor nails were in complete disarray. I fixed the frequent breakages completely by accident. I noticed that my nails kept breaking at the same point, so I just started to file down those areas on one of my nails and I ended up with the most remarkably shaped nail. They're called 'Stiletto Nails' but to me they look like actual talons. Whatever they're called, the nail felt a lot stronger than it had before, so I took the plunge and did the same to the rest of my nails.
In my opinion, it's not possible to completely prevent your nails from breaking, they're prone to catching on things, bending and just generally go through an awful lot on a daily basis so don't get me wrong, my nails still break, but I find it happens much less often and much higher up the nail. The days where a broken nail was a life-changing event, are now firmly in the past. The only slight downside is that when it comes to entering my debit card pin, sometimes my finger can't actually reach the buttons! *Mental note: call bank and order contactless debit card*
To get around the other issue, chipping of the lacquer, I decided that wherever possible I'd make sure that I put a little bit of extra effort in to my nails and go for some nail art. Instead of just sloshing on a couple of layers of basic nail polish, I'd try to go over and above that. Even if it's just a really simple nail art look, like this one, I find that it tends to be more resilient against the day to day horrors our nails face.
Yesterday after getting home from work I thought I'd remove the polish I had on at the time and give my nails a fresh lick of paint. Whilst going through the removal process, a luminous yellow from my big box of polishes really stuck out, so I applied that. In the meantime I botoxed my hair (see this post!) and rinsed that all off. Whilst doing that in the shower I just kept looking at my nails and not really feeling the colour, so I removed all of that too!
Whilst removing the yellow I recalled that Ombre nails have always seemed to last longer in the past without chipping off, I presume it's because the layering effect that I use builds up a strong lacquer on the nails. I'd seen a few photos recently of Gradient French Manicures, now I'll have to confess here to never having had one, although I did have professional manicure done once, in Dubai - it was cheap as chips but I just wasn't prepared for the pain! So I thought I'd replicate that Gradient French Manicure look, without all the pain of having my fingers poked and prodded!


For my Gradient French Manicure Style Nails, I picked out the colours 'Reno' by Mavala and 'Matte White' by Barry M , but in all honesty it doesn't matter what brands you use, as long as there's one nude and one white. First up then, I gave my nails a coat of Reno, which is a lovely nude shade, and let it dry. Next, I painted onto a sponge an approximate half-nail sized patch of Reno and another half-nail sized patch of Matte White - it's important that you paint them adjacent to each other on the sponge, as if you were painting your actual nail.

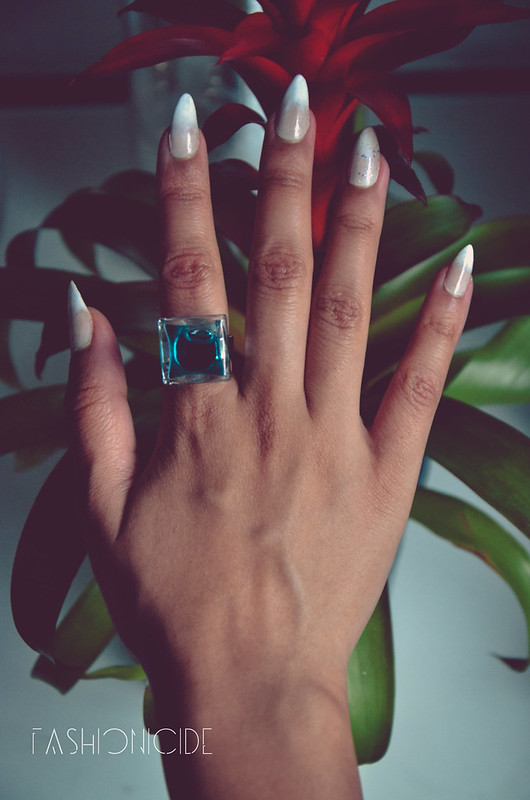
Finally, where the Gradient magic happens! I take the sponge and dab it softly on to the nail, taking care not to move the sponge up, down or across the nail. Simply dab it on to the exact same spot until the white part of the nail becomes opaque. The gentle pressing action of the sponge on to the nail will ensure that the edges of the nude and white sections blend together, so there's no need to move the sponge up and down - in fact doing so may blend it together a bit too much and the effect will be lost. There's an amazing video tutorial here on how to do it that I'd encourage you to watch.

To complete my look, I wanted to apply Essence's 'Icy Fairy' to the nails, but after applying to the first couple of nails, I thought it might look a bit overbearing if I applied to each and every nail. As it happens, I think applying it to just two nails gives the look an extra depth and artsy look that all-out glitter action just couldn't compete with.

More Tea, Vicar?




Ok so I may have lied at the beginning of the post, it's not entirely dedicated to nails but how could I resist talking about my absolutely f**king amazing square clear glass mug complete with green tea for artistic effect? I saw these in TK Maxx at £15 for a set of four with a rustic display stand that they all slot into. As soon as I laid eyes upon them, I wanted them. But my little sister had a go at me about wasting money or something. That's right. My little sister. Luckily I don't really listen to rhyme or reason when I see a weird and wonderful item at a bargain price - so I bought them anyway. Funnily enough, my mum came over a few weeks later and I served her tea in one of the mugs and she was mesmerised!
That's right sister. 1-0 to Lima. ;)


0 Yorumlar